The SWMC Wiki is currently under review.
Sewerpipe
TIDAL STATUS
The entire sewerpipe area is above water 2.5 hours either side of low tide. However at neap high tides it is possible to do the problems on the back walls
PREAMBLE
Sewerpipe Area
Take the narrow path down the sewerpipe
At high tide in summer, swimming is a viable alternative to bouldering and it is great fun jumping in from the top of the lion. The lions den is submerged but it is possible to swim through taking advantage of the mid way air pocket. This is also an ideal venue for bouldering with dogs and/or children as the various walls keep things fairly managable. There is much exploring to be done. The area lies 200m east of Rotherslade bay. For those who like ticking UKC logbooks the problems can be found in 'Limeslade Crag'
|
ACCESS
Drive up through Mumbles High Street and turn left at the Baptist church. As the road nears the top of the hill take the second of three adjacent left turns and park in the road.
Walk down to Rotherslade and take the coastal path East. After a couple of hundred yards a path right leads to an earth canyon containing an old Sewerpipe - Follow this to the sea and tun left. An alternative approach is to boulder hop from the beach.
Warning : Do not be distracted by the delights of the cafe - you can visit that later.
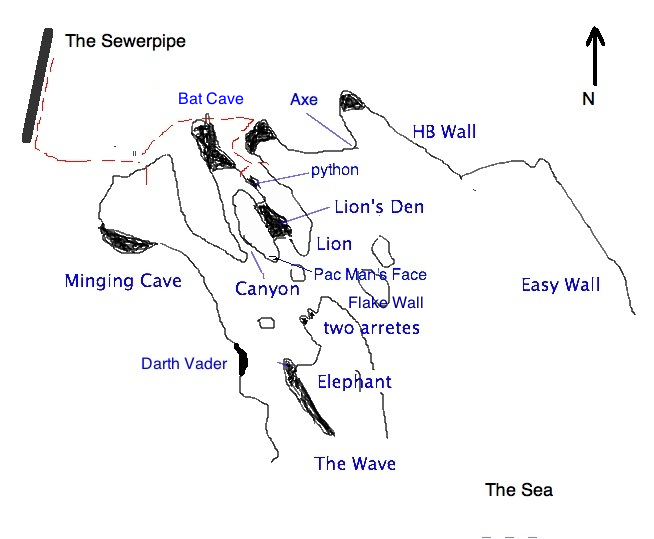
MAP OF AREA
THE BOULDERING
The Minging Cave
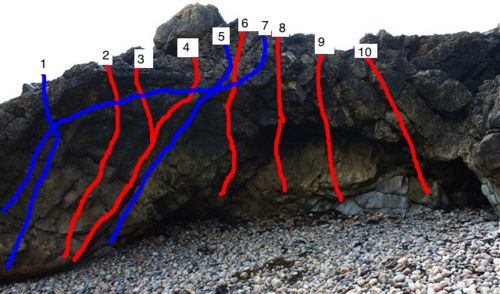
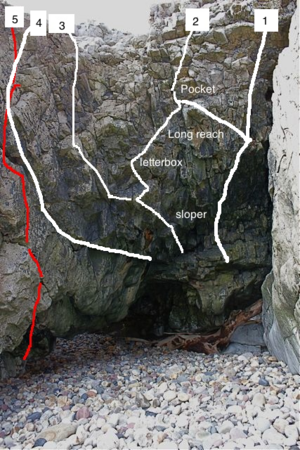
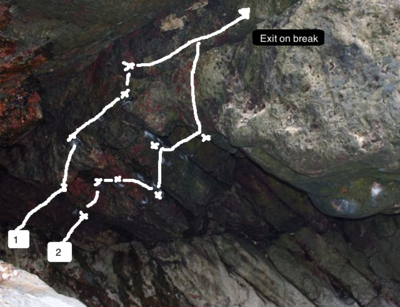
| On arrival at the site the first thing you will see is the minging cave. Although this is usually wet, most of the holds are positive and the problems are actually quite good.Now fairly solid after plenty of traffic
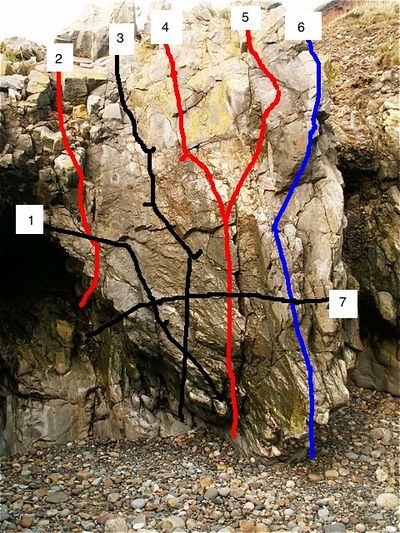
1. Easy jug pulling on steep ground 2.Harder jug pulling (or use the sloper) further right 3. Sit start on the arrete , move left via an undercut pocket - powerful 4. Layback the holds on the arrete all the way to the top 5. The easier layback groove 6. Safer Surfing V2 * . Depending on level of pebbles sit/crouch start using in a large wet hole at the back of the cave. A good move gets you established on a sloper further out from where various powerful crimps lead to the top. 7. The long higher traverse line. 8-9. There are various ways through the big overhang 10. Start in a subsidiary cave on the right. A rising traverse leftwards . 11. The canine chalk bag heist V4 *. Start on a low boss well out left of the main cave, traverse right along an obvious break to an awkward rest position. Launch round the first arete to reach the start holds of the layback groove. From here launch out rightwards via a painful pocket to slopers and a very steep sequence to good holds in the back of the arch. Continue rightwards to finish at the right hand end of the crag. Benefits from a dry spell. |
Darth Vader Area
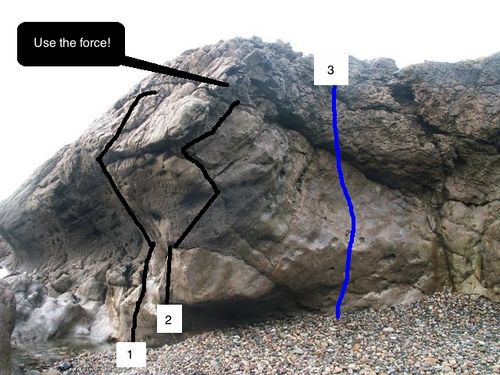
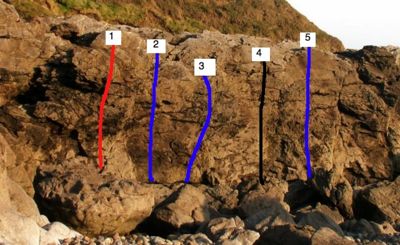
| Follow the wall down from the cave. This is the scooped area of smooth stone and the overhang to its left
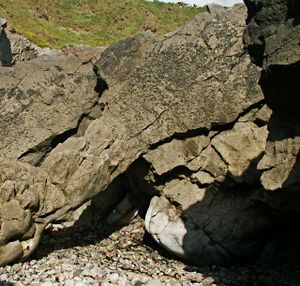
2. Darth Vader V3: Start with your left hand in a smallish pocket in the break, smear the smooth rock and launch to a crimpy pocket/crack up right. From this tenuous position smoothly reach up for the high break and move up slightly rightwards to the top. A very good problem which should soon be barnacle free if enough people have a go! 3. Find a way up the smooth teflon slab. Better for the flexible |
The Elephant
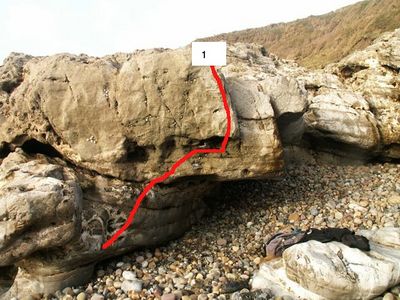
| There are rumours that this is a cousin of the more famous one last seen in Fontainebleau.
1. Start round the back then up a meter or so, traverse right round the front and up to a highball finish |
Two Arretes
| 1. Smooth Arrete V2 : a slopey body tension smeary type thing - most unlike limestone
2 The left arrete - traverse in from the left and up the arrete. A harder sit start direct variant is also possible at V3 |
Flake Wall
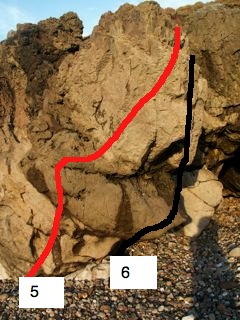
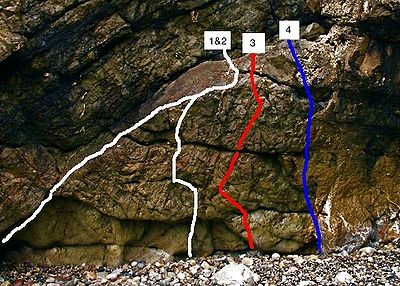
| This is generally a good warm up area but 'Flakey Pastry is worth doing in its own right
1. Up the left hand side then along the flake to its peak. Top out 2. The Wall to the right becomes generally less well featured but there is a prominent right facing spike/side pull 3 feet below the top of the flake. Use this to get to the top. 3. Flakey Pastry V3 *: Gain a less than positive left facing side pull a foot to the right of the key hold mentioned in the previous route. From here tend rightwards to the top of the flake. An interesting sequence. 4. The very obvious flake line from the right. 5. To the right of the flake you can do a short problem straight up the wall |
The Canyon
| The climbing is on the right wall of the Canyon (facing in). Starting on the right
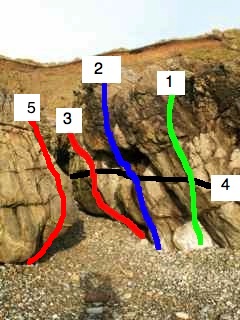
1) Up the Right hand wall 2) Straight up and over the bulge from sit/crouch start jug 3) Leftwards rising traverse under overhang - some long reaches 4) Si's traverse V3: a left to right low traverse. This finishes up Pac Man's Face . 5)Leg up for shorty V2 : One or two move wonder but daft positions make it fun. Starts on the seaward face of the left side of the canyon. Left heelhook on the LHS shelf, hands in the vertical slots in the middle. Somehow pullup (using intermediate sloper if you wish) and gain the large RHS sloper. Pull up using a sidepull on the LHS and gain the ramp.
There are numerous variations |
Pac Man
| 5) Start on low jugs then a couple of big swings up right to the top
6) Sit or crouch with your right hand on the end of the lower protrusion (pack man's lower lip) and with feet in the slot. Work up via a hard heel hook and RH slap in the crack to gain a standing position on the lip. Finish easily 7) (Not shown) Work into the overhang from the right (about V1) |
The bat Cave
| Very Steep climbing. The rock high on route 1 has some rickety holds but is generally much better than it looks! The ground level varies quite a lot in these parts
1. Once is enough (V5) Sit Start as for Louis Armstrong but attack the overhanging cave directly using powerful side pulls. Move right towards the top avoiding breaking your head on the rock below if possible. The 'safe' variations goes left at mid height to join Louis Armstrong 2. Louis Armstong * (V3) Start at the back, traverse leftwards on the steep wall via an obvious sloper. Make a long reach horizontally leftwards to a side pull. From here negotiate your way to a left facing layback position on good holds further left. Pull vertically upwards to a letterbox and up and right again to a reasonable hold on top of a hanging block. Holds improve while the rock gets more worrying for a few moves to the top. Variations possible - the best of which at v4/v5 is the direct version. Dont use the large sloper and go straight up to the hanging block via a powerful pinch. 3. (V3) This shares the start with Louis armstrong but carry on traversing instead of going upwards to the letterbox. The ground eases so you can make your way to the top 4. (V4/5) Low sit start by Louis Armstrong. Take the lower traverse line to more amenable ground 5. If the pebbles are down, a sit start with a couple of hard pulls leads to more amenable climbing to the top. |
The Python
| This feature makes for a bit of fun
1. Sit start on the left of the python and hook either side. Shimmy up to the face on the right and exit on sharp crimps |
The Lion
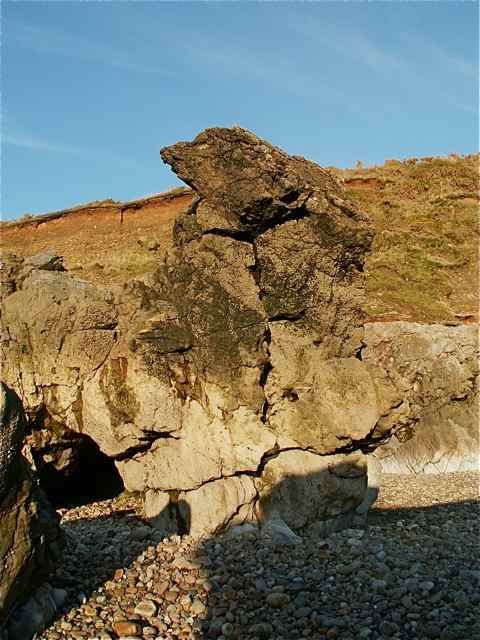
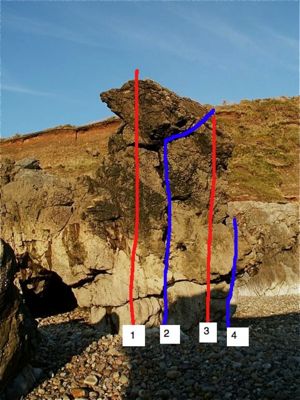
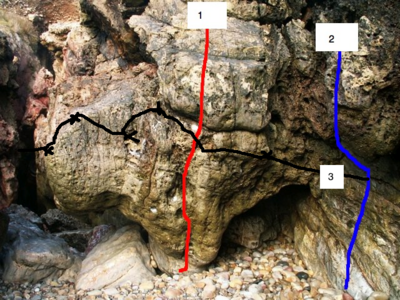
| This wonderful feature dominates the area.
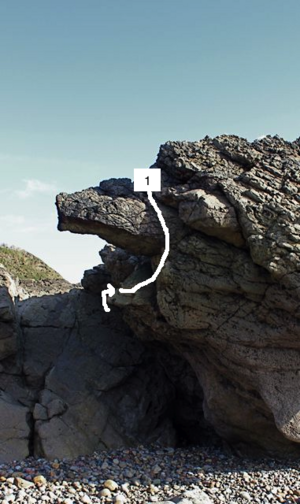
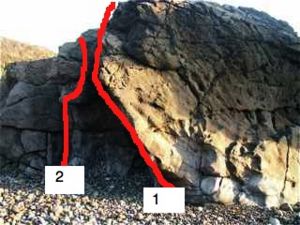
2. The easy way up on jugs 2a. Lion's whiskers V2/3 An eliminate highball between 2 and 3. Uses a prominent side pull rail and a bold move up to the break 3. The right side of the wall using the arete 4. A short jamming problem |
The Lion's Den
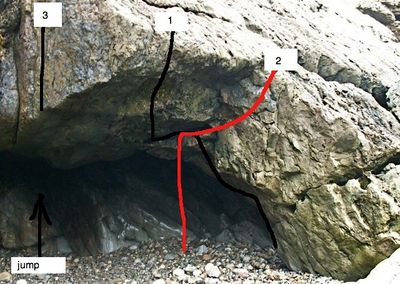
| There are a couple of deceptively hard problems here
1. Anemone traverse V6. Traverses the west side of the though cave in the centre of the crag. Sit start from a jug/pocket by the left hand seaward entrance to the cave, and traverse all the way through it before topping out after passing under the final rock bridge. 2. Lions Cave V3 From under-clings inside the cave make your way up the middle of the head-wall to the top. No bridging left allowed! A good preliminary extension can be done by going back 3m into the cave to a jug handle on the right wall 3. Lion's Garden V0 The right hand wall via a jug (holds on the right wall are forbidden) |
The Axe
| 1. Chris' traverse V3 Chris Allen's sit start and up the left arrete. Uses some exquisite slopers.
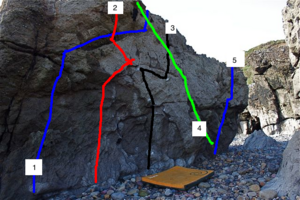
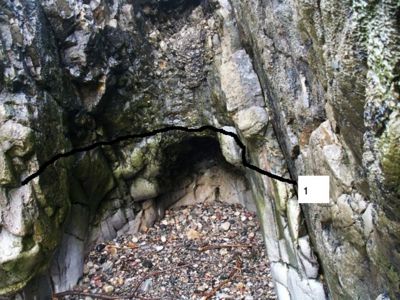
2. Start in the cave, move on to the arrete and then up the seemingly fragile cemented area 3. A packet of crimps V3/4 Start using a finger tip crimp 30 cm left of the large crack for the right hand. Power up to an even smaller (but positive) edge and from there to a slightly more secure crimp/pocket midway up the wall. Head for a small right facing edge and then to the block protruding from the top of the wall. Superb if you like small, spaced holds and careful footwork. 4. Entrance exam V0+ Start up the crack then on good hidden holds to the top. Necky. 5. A right tending variation is harder 6. The right arrete 7. Danny's traverse V3 low traverse via a baffling sloper also used in (1). Start in the cave. A higher line is significantly easier
|
The Back of the axe
| Usually wet but this thuggy and delicate traverse is worth waiting for
1. From Easy ground on the right use holds under the lip to bridge across the cave, From there traverse leftwards to the Axe arete |
The HB Wall
| This slightly impending wall gets a bit bold at the top
1. A fierce layback finger crack - lean to the right 2-5. Various other ways up the wall |
The Easy Wall
| This wall has a a number of easier problems (and one hard one) but the landings need careful padding.
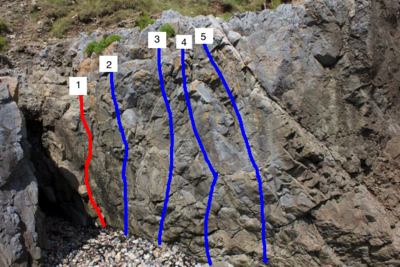
1. Take the Bulge Direct 2. A route going up right of the bulge 3. Take the wall between the bulge and the smooth area 4. The smooth area. Sit start with feet on small ledges - not the big one. Work up on undercuts and crimps to a sloper out left then up to a right crimp and a hard pull to easier ground. A good problem 5. The right side of the wall |
On the East Side of the sewerpipe area there is a headland which contains some climbable rock. A little gem of an area can be found at low tide slightly west of the end of the headland.
Headland Gully
|
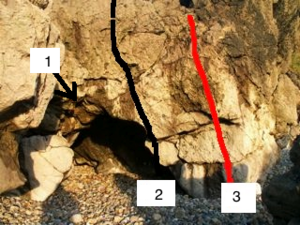
1. A Sit start with feet on the left hand side, move right and up the nose. Alternatively traverse around the end of the overhang or at V2 do a direct move for a small pocket in the flat face and upwards to the top 2. To the right of this is a good looking V too difficult for me through the roof using slopers and a long long stretch 3. Just right again sit start and climb powerfully using an undercut pocket through steep territory to the top. 4. Start as above but take a rising traverse line to finish a couple of metres to the right of the previous route On the other side of the gully is an obvious cave. 5. Power up from inside of the cave using the left wall for hands (but you can use the right side for feet!) V2 6) Climb from inside the cave to to right wall
|
to the east of this there is a another bay which in general does not have the quality of the sewerpipe area. However, the problems it does have are brilliant. At the top of the bay there is a large cave with some futuristic lines if it ever dries. Bender Wall is to the left of the cave. Red roof starts at the large pillar on the right hand side of the cave. A little further to the right, around a block you will find the pillar forming the outside wall of a narrow zawn.
Bender Wall
|
1a. The three Cs V4 * Sit start at outside the cave of 'On the town'. Avoiding the juggy crack traverse out on small holds to reach the sloper traverse of out on the town - finish up this. Although somewhat contrived this is a good problem. 1b. On the town V2 Deep within the small cave left of bender wall jam out to a line of slopers. At the Apex climb up to the ledge. Brilliant 2. A shorter version, sit start and work your way up to the slopers via a good sidepull at 5 feet 3. The right hand line yields to strong fingers or a great dyno from the break to a jug - sit start 4. The right hand crystaline line
|
Red roof
|
1. Hole Hanger: V4, From a jug at the back of the pillar work outwards up to jugs then to a large crystal hole. Using brute strength or exquisite footwork/body tension reach up to the lip and on to the top. 2. The wimpy version 3. The jump onto the wall - reminiscent of cliffhanger? 4. Chris Squared V5 *. Sit Start on the left hand side of the pillar and work to a hidden jug behind some bright red flowstone. From here move upwards and rightwards following a line about 1m higher than the arc. Work out along the apex of the cave to the headwall and finish right. Similar to the arc but longer. 4. The Arc V4. *** A Classic which benefits from a period of calm dry weather,. Start at the foot of the pillar . Work up rightwards on spaced holds to an almighty jug handle in the landward side of the roof about 3m from the start point. From here make your way to the headwall and up on crimps. Its easier if you go up one big move inside the cave before moving out, Chris Allen, 31/3/11 5. Taste the rainbow V8 **. Starts as for The Arc but then takes a direct line through the roof on pockets, then traverse into the finish of The Arc. Eliot Stephens, 4/10/12 6. Taste the Rainbow Direct V9. A harder version of The Arc taking a direct line through the roof and finishing direct up the overlap in the side wall. Eliot Stephens, 4/10/12 4,5 and 6 are on UTube. |
|
1. Rainbow trout V4. ** Takes the normally wet roof on its left hand side using pockets in the head-wall and some amazing holds in the roof . It eventualy becomes possible to reach the break which cuts across the head-wall. Follow this out and to the top 2. Red planet V4. * Like rainbow trout, needs a dry spell to come into condition. Follow the right side of roof out on amazing holds untill it is possible to cross to the other side of the domed roof. From here swing out to the headwall and its escape break. The vertical right wall is out of bounds
|
The Pillar
|
1. From a sit start work your way directly up the pillar. Those with strong arms and fingers will pull straight up, those with core strength will use the RH wall for feet. 2. The bulge on the RH wall 3. Labradoodle v3 : Traverse across the pillar
|
