The SWMC Wiki is currently under review.
Rhossili Sea Level

Contents
TIDAL STATUS
BOLTING POLICY
See individual crags
PREAMBLE
ACCESS
DESCENTS
THE ROUTES
Black Wall
The short wall off the beach just before the shipwreck in the cove,strangely enough it's black.
- Thieving Parasites - Fr. 6a
Boulder up the barnacles easier above. - Wittle Thieving Lankers - Fr. 5
Shares belay with previous,take a rock 7 if you are of a nervous disposition. - Fats Waller - Fr. 7a
Technical groove. - Route With Two Pockets - Fr. 7b
Big moves! - Black Adder - Fr. 6b+
Small then bigger holds. - Strongbow Flyer - Fr. 6a+
Tricky start. - Rum Thieves - Fr. 6a+
A better route.
Shipwreck Cove
About one third of the way along the beach heading towards Kitchen Corner is a small cove with a wildly overhanging west wall. Two diagonal breaks trending left cut through the left side of this tidal wall.
- Stuart's Stolen Project Fr 6c
Was a closed project stolen 17 may 2014 along with Hand Shandy. - Mutiny Crack - E4 6a
Probably here? Follow line of large pods to roof then jam to the BB of Attrition. - Wrecking Ball - Fr. 7a+
Bisects the following route. - Attrition - E5, 6a
Trad, 1997, by P.Littlejohn, bolt belay saves a 50 m loose top out. - Marine Layer - Fr. 7a
The sporting diagonal, L.O. shared with Wrecking Ball. - One Ton Depot - Fr. 7b+
Crux at top. - Vennerne - Fr. 7c+
Steep. - Air Show - Fr. 8b
A former closed project of Adrian's.
There is another closed project of Rob Lamey's beyond here and two very steep routes at the right hand end of the cave. Above these two route are several recently bolted "closed works in progress" awaiting the return of dry conditions. - Eurofighter Fr 8b
A bit steep - Helvitia Fr8b+
Pretty Steep - Delta Dagger Fr 8a
Just steep - Gunshow Fr8a+
A link cup best supped when dry. - Cannonade Fr 7c+
Much steepness - Achilles Wrath - Fr. 8b
Super steep roof work, Chain L.O. above the cave lip. - King George vs. The Suffragettes - Fr. 7a+
The right side of the roof via a steep boulder problem.
Up above are a series of "easier"routes many of which are traversing in nature and still a bit wobbly. Best stripped by seconding and done when the circus is out of town below.
- Elvis Was A Longboarder Fr6a+
Raw - Cocky Black ChauffageFr 6c
Up by there,risque by jove. - Cross Incontinents Fr 6c
Just pad on up,often damp. - Nice day for a fake weddingFr 5c
Easiest here - Jack Ketch's DanceFr 6b
More up by there butty - Dylan's DelightFr 6c
Right up by there.
On the right wall of the cove are six completed routes.
- Blockiness - Fr. 6c+ ***
Brilliant steep climbing on (mainly) huge buckets. Tricky to read if unchalked.(a large block has parted from the start in overwinter storms so the grade may be altered). - Sand Man - Fr. 6b
The central groove line. Good off-balance climbing marred slightly by the corner which forms a sand chute. - Par 3 - Fr. 6b+ **
Cracking wall climbing with good rests between steepenings. - John's Route - Fr. 6a+ **
Another cracking wall climbing with good rests between steepenings based around the shallow cave/roof. - First Handout - Fr. 6a+**
Gain the ramp continue to a niche with belay above. - Make a Splash/Hand Shandy - Fr. 6a+
Was a works in progress, to same belay as previous, now a stolen project! (see ukc logbooks 17 May 2014)
Seamen Walls
Between Castaway Cove and Mermaid Wall runs a short wall with several pocketed overhangs and corners.
- Bored of Toad Hall - Fr. 6a
Ascend the first cave on its right-hand side. - The King's Shilling - Fr. 6b**
The overhanging crack. - Captain Jacque Hoff - Fr. 6b+**
Direct asualt on the overhang via its right hand side. Same LO as previous route. - Concrete Cow - Fr. 6a
Commnece the corner via a roof,gnarly start. - Smeatons Stump - Fr. 5+
enter the corner from the right via easier terain. - Seamans Taines - VS,4c
The crack/chimney direct,avoid eternal damnation by not clipping any handy bolts then lower off the prefixed ab rope,or top out and scramble 60m up vertical grass to the path. - Good Ship Venus - Fr. 5+
Right of crack stepping left to belay of previous.. - Lamisil - Fr. 6a
- Zetuwit - Fr. 6b
- Atrumen - Fr. 5
- El Cino - Fr. 4
- Frappacino - Fr. 4
- Pure Cino - Fr. 6a
- Catapult - Fr. 4
A square cut rib. - Shengen - Fr. 4
Wall R
- border Control - Fr. 4
Fine wall R again. - Checkpoint Checkout- Fr. 5
Slim black groove. - Andre Marriner - Fr. 5
Faint black groove gained from L. - My Maid's Mermaid - Fr. 5
Short black corner. - Marinier - Fr. 6a+
Black wall R again. - Black Sea Shanty - Fr. 5
- Sea Shanty Rib - Fr. 4
- Seaman's Sea Shanty - Fr. 5
- Seamen In The Groove - Fr. 5
- Thems be Barnacles, them's be - Fr. 6a
- Operation Seaman - Fr. 5
- Me Harty's - Fr. 4
- Seaman's Limbo - Fr. 6a
- kickback Tar - Fr. 4
- Whispering Whelks - Fr. 6a
- Barnacle Thrill - Fr. 4c
Black rib. - Pumping My Bilges - Fr. 6a
Roof - All Hands On The Seacocks - Fr. 4a
Easy wall to shared belay.
Can someone draw some lines please?
Mermaid Wall
Only a 5 hr tidal window (varies with neaps and springs) so take care not to get cut off (common sense really). Escape is possible up the easy scramble and vertical
Sheepbone Wall
BOLT POLICY: No bolting.
A gem of a crag located immediately below the seaward arete of Trial Wall. Scramble down to some ledges about 12m above the sea and abseil down one of the corners to a platform. The right-hand one (when facing seaward) is Chimney Crack, the left-hand one is Great Diedre. At the base of Chimney crack is an oval pool and a blunt arete to the left.
- First Diedre 10m D
Climb the groove to the left of the blunt arete. - Mauk Wall 10m S,4a
Climb the steep wall right of the blunt arete and left of a prominent curving crack, passing a projecting block. - Curving Crack 10m HS,4b
Climb the rightward-slanting crack. - Chimney Crack 10m VD *
The obvious corner and chimney crack right of Curving Crack. - Skull 10m HS,4a
Climb the steep wall 1m right of Chimney Crack. - Cross 12m D
Climb Skull for 4m to a sloping ledge. Step right from this to finish up a square-cut groove. - Deep Cut 18m VD *
Climb the wall 3m right of Cross to gain and finish up a steep crack. - Great Diedre 12m S,4a *
The obvious black corner 6m right of Deep Cut. - Yellow Edge 12m S *
Start just right of Great Diedre. Climb the right wall of the arete until a leftwards traverse to it can be made. Follow it to the top. - Great Diedre II 15m VS,4c
Climb the corner 3m right of Yellow Edge, with a tricky overhang at 8m. A slight variant climbs the crack in the left wall (HVS,5b). - Pistas Canute 15m VS,4b *
Climb the arete dividing Great Diedre II and Slanting Chimney, coming in from the left. - Rhiannon’s Route 17m HVS,5a
Gain the Pistas Canute arete from the right. - Slanting Chimney 14m VD
Ascend the obvious slanting crack. - Gambolling Gareth’s Arete17m E1,5a *
Gain the arete to the right from the right and climb it direct. - Gamble there’s a Hold10m E3,5c
Approach from the right and follow the leftward-slanting crack right of Gambolling Gareth's Arete to a long, hard move where the crack closes. - Recess Crack 17m VS,4c
Climb the square-cut recess 6m right of Great Diedre II and then the crack splitting its back. - Recess Arete 6m E1,5b
Climb the short hanging black arete forming the right edge of the recess of Recess Crack. - Gamble There’s A Hold 16m E1,5b
The back arete forming the right edge of the recess. - Barnacle Ramp 17m D
The rightwards-rising crack and ramp right of Recess Crack. - Deep Water Go Slow 17m E3,5b *
The arete to the right.
At the right hand end of Sheepbone Wall is a cave. These two routes start from above the high water mark on a slabby ramp on the left. - Error’s Corner 9m E1,5b
Climb the corner, swinging right to finish. - Error Flynn 12m E4,6a
Traverse fingerholds rightwards across the black wall above the cave to a crack. Follow the hairline crack and faint groove in the steepening wall to the top.
Terrace Wall
BOLT POLICY: No bolting.
40m south of Trial Wall and Sheepbone Wall is an obvious terrace just above sea level, bounded on its right by a deep inlet. The route starts up the corner formed by the right (south) end of the terrace.
- Zig Zag 15m VD
Climb the corner to a ledge, then take a vague groove in the wall above on some wobbly jugs. - Pillar Edge 15m HS,4a
Climb the left-hand arete of the inlet on its left side. - Central Gully 15m D
The original line has been rationalised. Take the left-hand crack in the gully. - Slab And Crack 15m D
Also rationalised. Climb the right-hand crack in the gully. - Deception 20m S
Just right of the deep inlet is a crack and corner at half-height. Gain this by the pocketed slab below. - Deceit 20m S
Gain and climb the less obvious corner to the right of Deception. - Fisherman’s Bend 15m HS,4a
The centre of the wall 20m right of Deceit.
Sinister Sister Zawn
BOLT POLICY: No bolting.
40m further along the beach towards the Worms Head is a narrow zawn with a large jammed boulder at its back. Access is by scrambling down on the north side of the zawn.
- My Favourite Colour 10m E4,6a
Start from a flat back ledge 12m above the zawn bed above the jammed boulder. Scramble up a mucky rift, then access the pink soaring crack. Exit right from this. - Spacetalk 10m E2,5c
From the top of the rift take the handrail rightwards to a commiting move onto a triangular hold gains the top.
The next two routes start from the jammed boulder. - Pop Idol 18m E5,6b ***
Swing right into the right-hand of two cracks. Climb this until it closes then undercut left to and into overhangs. Pull up, PR into a pink groove and follow this to the top. - Pop-Eyed 18m E4,6a **
The crack and roofs right ot Pop Idol. The first ascensionist route description makes no sense, so good luck! - Splash And Grab 18m E6,6b *
The tapering wall to the right. Swing right from the boulder and move down the right hand crack to a horizontal break. Follow this right for 2m. Follow the black face above, trending slightly right to the left hand side of the arete (hex). Reach left to good holds and pockets in the thin upper wall. Gear is very specific. - Sinister Sister 21m E4,5c
Follow the arete 5m right of the jammed boulder to the break. Arrange protection and continue up the arete and groove, TR. - Wiggly Woo 21m HS,4b
Climb the gully and obvious narrow pillar right of Sinister Sister. Some poor rock.
Evening Wall
BOLT POLICY: No bolting.
60m south of Sinister Sister Zawn is a yellow wall with a distinctive calcite patch and a large ledge at half-height to the right. The first climb starts from the beach or when the sea is in can be reached by belaying from the large ledge on the right and stepping down a couple of meters to a high tide mark ledge. Either way you gain a small ledge 2m below a wide crack. The best belay is 30m up the bank!
- Hey Mr Blue Sky 18m E1,5b
Cimb the wide crack to pass the ledge on the right. An awkward move gains the chockstone. Pull up onto the headwall and over the bulge, In place of the old peg, a nut can be used in a crack to the right to protect the friable finishing moves. - Banana Split 12m E2,5c
Start at the large ledge at half-height on the right. Post rock fall this route offers technical climbing with no protection at all until a nut can be placed where the old peg was at 8m (shared with previous route). Ascend the groove on the left side of the ledge until a hard move gains the upper wall. Move right, making thin moves to finish directly.
Yellow Zawn
BOLT POLICY: No bolting.
- Turning Japanese 18m E5,6a *
A route for Cyclone Rangers. Start at a large boulder. Climb a finger crack to a horizontal break then traverse right to a good slot on the yellow arete. Climb its left side. - Banzai! 15m E4,6a
Place bets now! A fine steep little route. Climb the arete easily to a sloping ledge. Make hard moves up a thin crack into a groove. Finish up a black wall heading slightly right.
60m right of Yellow Zawn and below An Audience of Sheep are three pillars, seen when looking out to sea. The following route climbs the sheer south west wall on the middle pillar. - The Secret 17m E5,6b **
A direct line taking the centre of the smooth wall. Abseil to a good ledge at 3m, or scramble in at low water. Climb leftwards, then back right on white crystal rock, passing a poor PR with difficulty, to the horizontal break. Take the centre of the wall to finish.
The Platform Area
BOLT POLICY: No bolting.
These routes lie on a small rock promontory, directly below the prominent arete of An Audience of Sheep and north of and parallel to the very obvious large flat sea level platform. Approach is best made by following a path down to a good platform, on the south side of the promontory.
- Avoid Meeting The Portuguese Man Of War 40m VS,4a,4c,- **
When deep water soloing the sea is normally used for protection. Here it is used as a hold. High tide is essential. Best soloed for obvious reasons.
- 15m Drop down into the v-groove below the end of the path and traverse left at a low level under an obvious arete. Step up to belay in the through-cave.
- 12m Crawl through the through cave, then traverse the left wall (looking out to sea) to a platform on the arete.
- 13m Jump into the sea, at the lowest point of the buttress, swim across the zawn and finish easily up the wall on the far side of the zawn. (The leap can be made from the belay stance instead for added underwater time as The Leap Of Faith Finish).
- 15m Drop down into the v-groove below the end of the path and traverse left at a low level under an obvious arete. Step up to belay in the through-cave.
- Stardust 24m HS,4a **
A classic little pitch. Follow Avoid Meeting The Portuguese Man Of War until 5m before the arete visible from the start. Pull up over an overlap, then move left to gain cracks just right of the arete. Follow these to finish. - Year of The Snail 24m VS,4b *
Start as for Stardust but continue up the centre of the wall.
Poser Buttress
BOLT POLICY: No bolting.
A deep square-cut zawn 30m on, with a smooth south-facing wall containing four cracks. These are gained by abseil to a hanging stance. There is a big mooring ring can be used (just right of Splash Landing). Alternatively start from the floor of the zawn ¾ hour either side of low water. The routes on the greasy south wall will have to be done this way.
North Wall
- Normal Service 20m VS,4b
The most seaward crack. - Splash Landing 20m HVS,5a
The next crack to the right (landwards). - Dicky Five Stones 20m E3,5c *
Good. From the mooring ring, climb the wall between Splash Landing and The Poser. - The Poser 20m E1,5b **
The third crack right from the sea. Good. - Burning Rubber 20m E2,5b
The fourth crack.
South Wall
- Chlorophyll Corner 15m VS,4c
Climb a corner crack opposite Burning Rubber, near the back of the gully. - Lobster Song 15m E2,5b
Start directly up the arete right of Chlorophyll Corner, swing left and climb the slab, TR. - Cincinatti Kid 15m VS,4c
The crack just round the arete right of Chlorophyll Corner, in a narrow wall facing out of the gully.
Kitchen Corner
Bolt Policy: bolting.
The deep inlet at the end of the mainland. Access is by continuing along the bottom of the upper cliff line to reach easy ledges. The routes have not been checked for this guide and require abseil escapes.
- Dove Crack 12m M
The wide chimney in the back of the cove. - Kitchen Slab 12m HS
The slab in the upper part of the cliff is gained and followed.
ADDITIONAL PHOTOS
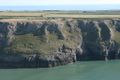
Mermaid Wall - Picture by Chris Fryer of Swansea Flying Club
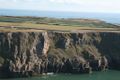
Trial Wall and Sheepbone Wall - Picture by Chris Fryer of Swansea Flying Club


FIRST ASCENTS
Black Wall
- R.Thomas 00.05.2014
- R.Thomas 00.05.2014
Shipwreck Cove
Castaway Cove
- D.Emanuel, R.Thomas 00.10.2014
- R.Thomas, D.Emanuel 00.10.2014
- R.Thomas, D.Emanuel 00.10.2014
- R.Thomas, D.Emanuel 00.10.2014
- D.Emanuel, R.Thomas 00.10.2014
- D.Emanuel, R.Thomas 00.06.2014
- D.Emanuel, R.Thomas 00.06.2014
- D.Emanuel, R.Thomas 00.06.2014
- R.Thomas, D. Emanuel 00.06.2014
- R.Thomas, D. Emanuel 00.06.2014
Seaman Wall
- D.Emanuel, R.Thomas 00.09.2014
- D.Emanuel, R.Thomas 00.10.2014
- R.Thomas, D.Emanuel 00.09.2014
- R.Thomas, D.Emanuel 00.10.2014
- D.Emanuel, R.Thomas 00.10.2014
Mermaid Wall
- X.XXXX 00.06.2014
- X.XXXX 00.06.2014
- X.XXXX 00.06.2014
- X.XXXX 00.06.2014
- X.XXXX 00.06.2014
- X.XXXX 00.06.2014
- X.XXXX 00.06.2014
- X.XXXX 00.06.2014
- X.XXXX 00.06.2014
- X.XXXX 00.06.2014
- X.XXXX 00.06.2014
- X.XXXX 00.06.2014
- X.XXXX 00.06.2014
- X.XXXX 00.06.2014
- X.XXXX 00.06.2014
- X.XXXX 00.06.2014
- X.XXXX 00.06.2014
- X.XXXX 00.06.2014
- X.XXXX 00.06.2014
- X.XXXX 00.06.2014
- X.XXXX 00.06.2014
- X.XXXX 00.06.2014
- X.XXXX 00.06.2014
- X.XXXX 00.06.2014
- X.XXXX 00.06.2014
- X.XXXX 00.06.2014
- X.XXXX 00.06.2014
- X.XXXX 00.06.2014
- X.XXXX 00.06.2014
- X.XXXX 00.06.2014
- X.XXXX 00.06.2014
Right Hand Pillars
- R.Thomas 00.06.2014
- R.Thomas Richie Phillips 00.06.2014
- R.Thomas Richie Phillips 00.06.2014
- R.Thomas 00.06.2014
- R.Thomas 00.06.2014
- D. Emanuel, R.Thomas 00.06.2014
- D. Emanuel, R.Thomas 00.06.2014
- D. Emanuel, R.Thomas 00.06.2014
- D. Emanuel, R.Thomas 00.06.2014
- D. Emanuel, R.Thomas 00.06.2014
Sheepbone Wall
- J.Talbot 00.00.1968
- J.Talbot 00.00.1968
- J.Talbot 00.00.1968
- J.Talbot 00.00.1968
- J.Talbot 00.00.1968
- J.Talbot 00.00.1968
- J.Talbot 00.00.1968
- J.Talbot 00.00.1968
- J.Talbot 00.00.1968
- M. Crocker 03.09.2003
- C.Hird, G.Evans, G.Richardson 00.00.1975
- A.Beaton, C.Allen, M.Danford 00.00.1989
- A.Richardson, J.Beynon 00.00.1992
- M.Harber Pre-1978
- A.Richardson, R.Lloyd, J.Beynon 00.00.1992
- M. Crocker - Onsight DWS 03.09.2003)
- J.Talbot 00.00.1968
- M. Crocker - Onsight DWS - 03.09.2003
- M.Crocker, J.Harwood 07.09.2003
- M.Crocker solo 03.09.2003
- M.Crocker solo 03.09.2003
- J.Beynon solo 00.00.1992
- M.Crocker, J.Harwood 07.09.2003
Terrace Wall
- J.Talbot 00.00.1968
- J.Talbot 00.00.1968
- J.Talbot 00.00.1968
- J.Talbot 00.00.1968
- J.Talbot 00.00.1968
- M.Harber 00.00.1982
- J.Talbot 00.00.1972
Sinister Sister Zawn
- M.Crocker 04.09.2003
- M.Crocker, J.Harwood 07.09.2003
- M.Crocker 07.09.2003
- M.Crocker 03.09.2003
- M.Crocker 07.09.2003
- A.Sharp, P.Lewis 06.03.1988
- J.Beynon, R.Lloyd, A.Richardson 00.00.1992
Evening Wall
- L.Davies, P.Bruten, P.Thomas 09.06.1986
- P.Bruten, L.Davies 00.00.1986
Yellow Zawn
- M.Crocker, M.Ward 15.08.1987
- M.Crocker, M.Ward 15.08.1987
- M.Crocker, M.Ward 15.08.1987
The Platform Area
- L.Davies, P.Thomas 00.07.1989
- A.Sharp, J.Harwood 18.10.1981
- M.Ward 16.08.1987
Poser Buttress
North Wall
- A.Sharp, J.Harwood 05.12.1981
- A.Sharp, J.Harwood 05.12.1981
- A.Sharp, P.Lewis 00.00.1990
- T.Penning, A.Sharp, J.Harwood 23.05.1982
- T.Penning, A.Sharp, J.Harwood 23.05.1982
South Wall
- T.Penning, A.Sharp, D.Hillier 27.06.1982
- L.Davies 00.00.1988
- T.Penning, D.Hillier, A.Sharp 27.06.1981
Kitchen Corner
- D.Jones, R.Owen, J.Edwards 00.00.1958
- D.Jones, R.Owen, J.Edwards 00.00.1958